
 FREE Next Day Delivery Available


Since 2004, we’ve helped thousands of businesses with their IT Cabling needs.
Today, we’re going to share with you some great ideas to achieve a really successful structured cabling installation.
So, let’s get started with the first of our top tips!
Tip 1 - It’s all in the Planning

Sounds like the obvious starting point – but so often it’s the downfall as a project progresses. Always make sure that you put aside well in advance quality time to collate as much information as possible, after all this is a really important project that you’re responsible for and you need to get it right from the outset.
Depending on if the installation is a refurbishment of an existing facility, or new buildings, the same approach always applies. Think about not only the obvious, but also any hurdles you or your colleagues may have come up against in the past. Try and picture the completed install and make notes and sketches along the way, these can then be pulled together at a later date.
Speak to other departments (not just IT) about their needs - short, medium and long term. Then, where possible, always plan for the long term as these budgets are going to be really important further down the line. Getting it wrong in the planning stage, can prove very costly to rectify at a later date.
Tip 2 - The 3 C’s – Category, Class and CPR
It is likely a combination of different standards will be needed depending on the required bandwidth and resilience of the proposed system. For example, Category5e or Category6 could be used at the network edge for the majority of user ports, whereas the distribution links from the core might be a mixture of Cat6a and Fibre, creating the backbone of the network. The demand for faster speeds is only going to increase, so think carefully about the life expectancy of the proposed system and what may be required in the future.
The vast majority of Cat5e and Cat6 installations tend to be Unshielded (UTP) and this solid cable is flexible and relatively easy to pull in to position. Any Cat6a links are going to be shielded, meaning they’re not only going to be more costly, but are likely to need larger containment as the cable will be less malleable due to its construction, much heavier in weight and have a restricted bend radius.
There is also the discussion to have early on regarding the required CPR rating of the installed cable. It is no longer acceptable to supply Low Smoke (LSZH) cable for permanently installed cable links within the EU. It is likely that a minimum specification for the Class, Smoke, Droplets and Acidity of the cable would have been defined depending on the building design and its proposed use. For example, buildings for public use such as schools or hospitals will require a higher CPR specification than a dual storey office building.
Tip 3 - The Floor Count

Hopefully you would have received a proposed layout showing desk positions, office partitioning and communal areas. Carefully mark on to the plan the required points, using different coloured highlighters for different services that will need data modules. This then allows for easy calculations for the total number of outlets required for each application, and will ultimately help to define the number and type of switch ports required. The majority of installers (although they might not present it in this way) would prepare a quote based on an average price per port across the structured cabling design.
At the same time, think carefully about whether you are opting for ‘in desk’ containment, floor boxes or wall mounted trunking. It might be that your proposed design incorporates a combination, either way, the cable containment element of the design needs to be carefully considered. Remember, some areas might require only single or dual modules, where other areas might require double faceplate with quad modules.
It’s far more cost effective to add in some additional ‘spare’ ports at this early planning stage. For example, you might have included for a standard group of 4 desks a total of 10 outlets for data, voice and a couple of printers. It would therefore be advisable to increase this to 12 ports if budget permits, as the cost for small ad-hoc installations at a later date can be both complex and expensive. The same rule applies for other areas of office space that may not be immediately populated, but space that could easily be utilised for expansion at a later date. It’s not uncommon to run additional cable runs to these positions and leave them un-terminated under the floor, so they’re ready and waiting.
Tip 4 - The ‘often’ Forgotten
Many elements when planning for a structured cabling design can be initially overlooked. The calculations for the voice and data ports is relatively easy, but what about all the other services that are required? These numbers can quickly add up and if not considered early on in the quoting stage, they can lead to project delays and unexpected additional costs.
Put plenty of thought in to the communal areas. The positions of Wireless Access Points and capacity for meeting rooms and conferencing equipment is fairly obvious. However, what about internal and external IP Security cameras, HDMI displays that are to be run off the network, workgroup printers and scanners as well as door intercoms and the integration of other intelligent building management systems. Be sure to mark all of these services on to the proposed layout drawings so you can correctly calculate the total number of cabling points to be quoted.
When taking in to account the provision of these extra services, this will not only help to determine the precise number and location of the data ports, but also the containment and routes that the cable runs can take within the overall design. In turn, this will help to identify the standard of cable required and also if any areas of the design will need specialist equipment to allow for working at height.
Tip 5 - A degree of Legacy
Most moves and changes tend to incorporate the installation of some older, legacy equipment. Maybe a telephone system is being relocated, or some equipment that needs specialist Coax, AV or Satellite connections, once again include these requirements in to the overall project considerations.
BT or other service providers will need to be scheduled well in advance as their lead times for certain connectivity could be up to 90 days from the date of order to final commissioning. You will need to determine exactly where these circuits are going to be terminated, as they could be presented in a different area of the building than where you were planning to install the connected hardware. Therefore, a provision for fibre links or voice pair cabling between the two locations might be needed. If security is a concern, perhaps these critical links need to be contained in a metal copex, as they will be the lifeline of your business.
Tip 6 - Sparky integration
As early as possible build a good rapport with the electrical contractor, as they’re going to be key in successfully delivering your desired solution. They will be able to assist in identifying the cabling routes and can help by installing containment for the structured cabling system in advance. You should take time to discuss the type of containment to be shared, any size constraints and the separation of power and data. They could also install any additional containment that might be required purely for the data element of the install, such as PoE devices like WAP’s and IP Surveillance that will not have power sources nearby or top of rack containment within a server room.
Any proposed containment needs to be strong and simple to install throughout. It’s so easy to over complicate containment as so many options are available, but do keep in mind the bend radius limitations and the quantity of cables being proposed to ensure that it’s fit for purpose.
Electricians tend to be involved early on in the project plan so can be really useful when it comes to the fabric of walls, risers and identifying voids. They’ll also be able to advise on the earthing and bonding of the proposed system. By engaging with them you will also have the opportunity to discuss the power needs for you racks. This could involve hard wiring that might be needed for a UPS and Generator switch equipment, Commando Sockets and the positioning of the PDU’s and any containment such as a busbar for the rack power feeds.
Tip 7 - The Healthy Heart
There is a lot to consider here, whether we’re talking about just a couple of racks in a server room or a large datacentre. This element could potentially be as big, if not bigger than the rest of the cabling work put together. The key point here is not just about planning rack positions and space for the active kit, but as importantly, how easy it is going to be to manage the structured cabling system in the future.
A number of Panel to Panel Copper and Fibre links may be required to ensure short length patching is available between racks. Where possible 800mm racks should always be procured, allowing room for tidy vertical cable fixing and management. Coloured containment could be utilised above racks to determine A&B routes for extra resilience depending on the overall design.
Consideration needs to be given to the positioning of Rack PDU’s and their input power feeds. This will assist in determining what positions to mount the patch panels, depending on whether the power enters the rack from overhead or up from under a raised floor. Remember to build in to your plan the IEC power cables, as well as fibre and copper patch cables and cable management products so that they’re on site and ready for handover. These alone can be a significant proportion of the cost, but an often overlooked part of the budgeted work.
Tip 8 - Patch Heaven

The whole reason for installing a structured cabling system is to ensure its long term ease of management, but yet so many people don’t consider this in the planning stage. Selecting the correct type and the final positioning of the patch panels in each rack is really important. Perhaps the design warrants angled rather than flat panels, and you may have a central patching frame for all patch panels to be terminated. Either way, you need to decide whether the patch panels are to be front or back mounted, or a mixture of each depending on the location of the proposed hardware and whether you are creating hot and cold aisles for cooling.
Historically, patch panels were always installed from the top of rack down, then the IT team would come in and populate the rest of the rack with switches and add in cable management bars. You’ve probably experienced yourself, that over time this can quickly become a tangled mess. The better plan is to leave spaces free between patch panels so that switches can then be added, resulting in a short, tidy patch. Better still, by using short length patch cables, there is then no need to use up valuable rack U space with horizontal cable management bars.
Have a good think about what labelling sequence will be required for the patch panels and also consider different colour patch panel labels or jacks for different applications, such as WAP’s and cameras. These can then be matched up with the same coloured coded RJ45 patch cables for quick and easy visual identification.
Tip 9 - The Management Standards
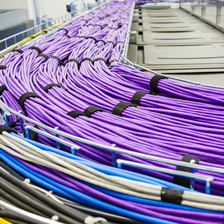
Nylon or Velcro ties? This is one question that we get asked on a regular basis. Although Nylon ties continue to be widely used, it is advisable to secure all data cable bundles using Velcro to meet the manufactures standards, therefore ensuring that the cable is not crushed in any way. Velcro is more expensive, but benefits from being available in an array of different colours, so once again you get that quick visual identification.
It’s likely that your cabling installer will use a tool such as a Data Cable Comb, ensuring that each loom bundled is tight and tidy, right the way through the containment and in to the rack. This clever but simple technique allows them to bundle the cables in multiples of up to 24 and ensures that the Velcro ties are securely tightened every 20cm along the route. This produces a really professional looking end to end installation.
Make sure that you consider the future patching requirements. Most manufacturers will warrant the system from the outlet/module to patch panel, therefore you don’t always need to stick with the suggested manufacturer patch cables. This in turn provides you with flexibility to select less standard lengths that might not have been otherwise available, with a greater choice of colours, reducing the need for too much cable management. If you decide to use short length 20cm patch cables between your switches, the natural loop created over the 24 ports will provide your own horizontal zero U cable management so that you can then pass through the odd patch cable that’s going to a different location.
Tip 10 - Accept the Freebie
There is an abundance of expertise out there in the form of manufacturers, distributors and installers - all positioning for your business. It is very unlikely that you will need to provision for any project management costs in your budget if you leverage on their assistance along the way. Don’t be afraid to bounce ideas around to help finalise the best approach and listen to the features and benefits that each party will be promoting.
It is also advisable to look over case studies of previous work that they would have undertaken, conduct telephone references and where possible try to arrange a visit to a previous installed site so that you can take a look. This will not only allow you to see for yourself the best practices of the installation, but also might spark a brainwave for a different approach to your intended install.
This free assistance will ultimately help to finalise you tender documentation, making it quicker and easier to then distribute to your preferred suppliers.
Tip 11 - The Selection Box
Selecting the right partner and ticking that box is of paramount importance. You would have spent months planning the solution and now you’re handing over to someone else to deliver it on your behalf – a lot can still go wrong! You now know the type of system to be installed and need to sign off on the project and issue that purchase order for it to be fulfilled. Your trust is now in someone else to make it happen, whilst meeting your high expectations.
Ultimately you now need to come in within budget, however there are some key elements that you need to think about before awarding the contract. For example, have you already met the Project Manager that will be assigned to the installation? Ask them if they have a large enough workforce to fit in with the proposed timescales and consider how local their team are to the installation site. Will they commit in advance to completing works outside the normal working hours if the project starts to slip behind schedule due to their bad management?
Often a main building contractor will be assigned for new builds and major refurbishment works meaning detailed Method Statements and Health and Safety inductions will be required before anyone is allowed to enter site. CSCS cards and other identification will need to be readily available for all employees and contractors and PPE Safety Equipment allocated. A DBA check may also be required if staff are working in certain environments. Delivery slots and storage areas need to be defined in advance. Everything must be carefully managed and considered to avoid unnecessary delays from the outset.
One final point is to ask is, are they using employed cabling engineers or contractors to deliver the project? A top heavy level of contractors can often be a recipe for disaster, so this is where the cabling Project Manager really needs to be on top of things from the start and right the way through to completion.
Tip 12 - A Celebratory Handover
So often this in the missing piece of the puzzle. You have ended up with a great installation but nobody has bothered to pull together the required documentation and ensure that it’s collated together. This is so important as this cabling bible will need to be passed from person to person in the future, after all, you are fairly unlikely to be managing the same installed system in 15-20 years' time!
Where possible, both a soft and hard copy handover manual should be created, incorporating drawings and all certification test results for the installed links. A Warranty Certificate will be issued by the manufacturer and would normally follow a few weeks (maybe up to a month) after the project completion – so don’t sign off on the final invoice for payment until you have received that, as escalating a future claim under the warranty could prove to be difficult. Perhaps a patching schedule could be created at this stage for future management so all IT staff kick off with best practices.
Ideally, a number of photos should be taken which will then assist with future moves and changes. Finally ensure that the site has been left clean and tidy, all surplus cable is to be removed from under floors and racks with rubbish being taken away from site by the installation team.
We’re confident that this is not an exhausted list as every installation is different, but it should be a really good starting point for you.
After all, we’ve done a fair amount of this in the past!
Russell Meehan
Operations Director, Patchsave Solutions Limited